主流的人脸检测技术几乎已经相当成熟了,刷脸系统就是一个常见的应用场景。 Insightface是一个开源的人脸分析项目。
如何人脸识别
代码仓库里面有一个scrfd.py文件,我们可以直接拿来使用,就可以识别人脸和确定关键点位。
下载人脸识别模型
在页面找到一个模型,比如buffalo_l模型,下载并解压出来。
下载一张人脸照片
可以使用代码仓库里面的照片。
测试代码
下载scrfd.py文件到本地,安装所需要的依赖,也可以参考下面的 Dockerfile。
FROM python:3.11.8-slim
RUN apt-get update && apt-get install -y tree libglib2.0-0 libgl1-mesa-dev build-essential libpq-dev python3.11-dev
RUN pip install click==8.1.7 itsdangerous==2.1.2 sqlalchemy psycopg2 \
  Cython>=0.29.28 cmake>=3.22.3 numpy==1.24.2 oss2 \
  onnxruntime opencv-python onnx scikit-image --no-cache-dir
导入需要的 package
import os
import cv2
import sys
import datetime
import onnxruntime
import numpy as np

sys.path.append(os.path.join(os.path.dirname(os.path.abspath(__file__)), '..'))
from scrfd import SCRFD
onnxruntime.set_default_logger_severity(3)

current_test_folder = os.path.dirname(os.path.abspath(__file__))
传入下载好的模型和照片
detector = SCRFD(model_file=os.path.join(current_test_folder, '../../models/det_10g.onnx'))
detector.prepare(-1)
img_path = os.path.join(current_test_folder, 'images/t1.jpg')
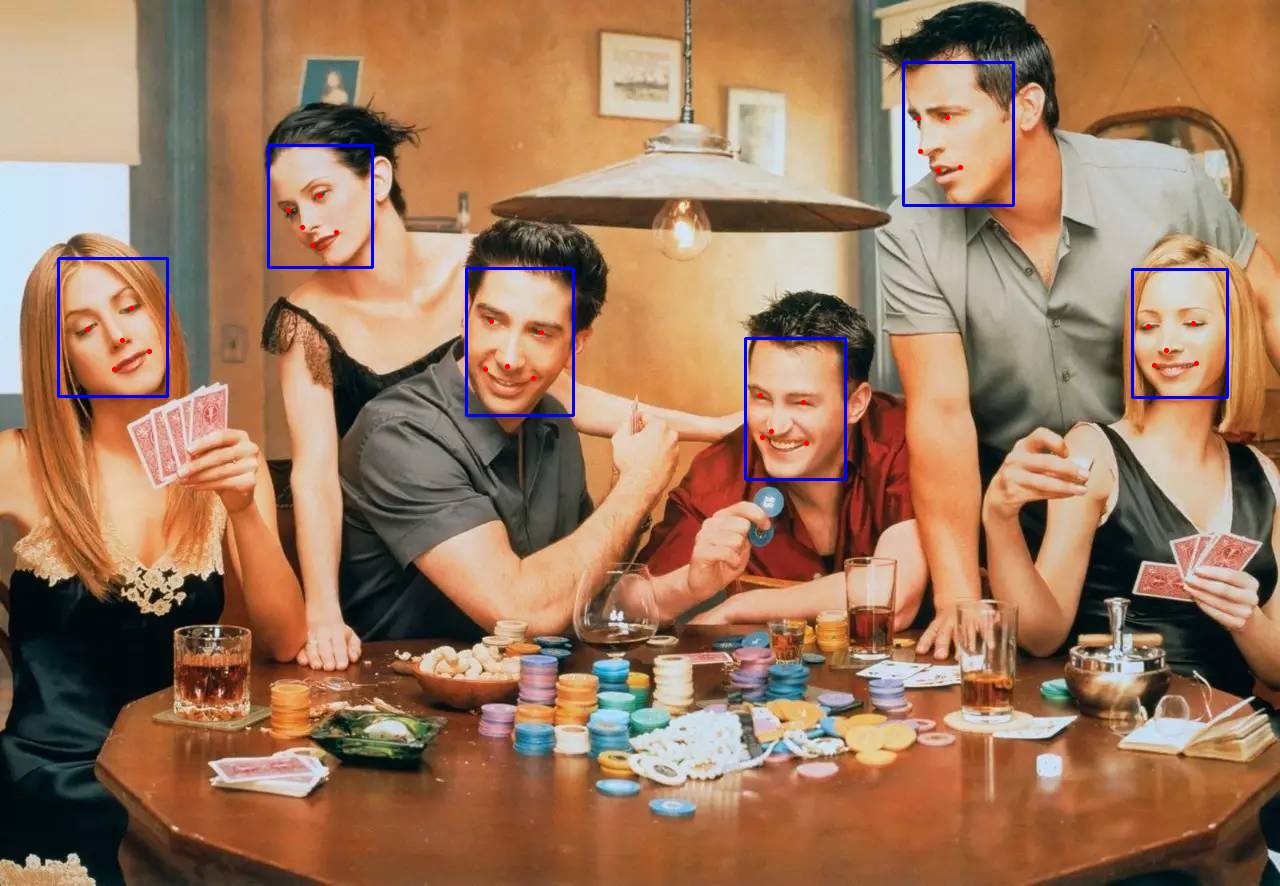
运行 detect 方法,该方法返回两个值bboxes kpss。
bboxes是检测到的人脸方框,每个方框分别有 5 个值,分别是左上坐标、右下坐标和检测概率值。
kpss是每个人脸的关键点位,分别是左眼、右眼、鼻子、嘴巴左侧和嘴巴右侧。
img = cv2.imread(img_path)

ta = datetime.datetime.now()
bboxes, kpss = detector.detect(img, thresh=0.5, input_size=(640, 640))
tb = datetime.datetime.now()
print('all cost:', (tb-ta).total_seconds()\*1000)
下面是 debug 输出的bboxes和kpss
# bboxes
array([[4.6608209e+02, 2.6861639e+02, 5.7358923e+02, 4.1553311e+02,
        9.1965330e-01],
       [7.4535284e+02, 3.3874139e+02, 8.4566339e+02, 4.7909033e+02,
        9.1180491e-01],
       [2.6849826e+02, 1.4560260e+02, 3.7232516e+02, 2.6700351e+02,
        8.8568395e-01],
       [1.1329001e+03, 2.6903189e+02, 1.2271696e+03, 3.9758008e+02,
        8.8179767e-01],
       [5.8770386e+01, 2.5865308e+02, 1.6752798e+02, 3.9619470e+02,
        8.7853539e-01],
       [9.0315533e+02, 6.2836594e+01, 1.0133536e+03, 2.0522063e+02,
        8.7140775e-01]], dtype=float32)

# kpss
array([[[ 491.85046 ,  321.8314  ],
        [ 541.85266 ,  332.11188 ],
        [ 507.67114 ,  366.41312 ],
        [ 485.91965 ,  369.691   ],
        [ 533.74945 ,  378.3811  ]],

       [[ 760.51294 ,  395.49942 ],
        [ 803.72736 ,  402.7126  ],
        [ 771.53094 ,  431.75635 ],
        [ 762.99475 ,  437.4276  ],
        [ 806.5269  ,  443.0071  ]],

       [[ 288.15448 ,  210.89319 ],
        [ 319.64374 ,  195.79184 ],
        [ 302.58087 ,  227.51608 ],
        [ 312.39685 ,  245.28354 ],
        [ 336.88794 ,  232.30792 ]],

       [[1148.8239  ,  326.0181  ],
        [1193.2102  ,  323.8155  ],
        [1166.1467  ,  350.2246  ],
        [1154.2952  ,  365.36026 ],
        [1196.0679  ,  363.4772  ]],

       [[  87.882385,  329.7735  ],
        [ 131.18228 ,  308.5124  ],
        [ 122.2902  ,  340.73746 ],
        [ 114.00639 ,  369.7087  ],
        [ 149.48508 ,  351.72122 ]],

       [[ 918.5967  ,  118.65146 ],
        [ 947.50104 ,  117.44199 ],
        [ 920.71436 ,  151.10785 ],
        [ 938.9482  ,  170.54126 ],
        [ 960.82745 ,  167.87477 ]]], dtype=float32)
描框和描点
对于上面找到的框和点,分别调用cv2.rectangle和cv2.circle进行描框和描点操作。
print(img_path, bboxes.shape)

if kpss is not None:
    print(kpss.shape)
for i in range(bboxes.shape[0]):
    bbox = bboxes[i]
    x1, y1, x2, y2, score = bbox.astype(int)
    cv2.rectangle(img, (x1, y1), (x2, y2), (255, 0, 0), 2)
    if kpss is not None:
        kps = kpss[i]
        for kp in kps:
            kp = kp.astype(int)
            cv2.circle(img, tuple(kp), 1, (0, 0, 255), 2)
filename = img_path.split('/')[-1]
print('output:', filename)
cv2.imwrite('./%s' % filename, img)
最后导出结果如下,可以看到模型找到了 6 个脸,以及每个脸的关键点位。
眼睛打码
因为已经拿到了眼睛的坐标点位,剩下的就是将眼睛区域描黑即可。
eye1 = kps[0]
eye2 = kps[1]

roi = img[eye1[1]:eye2[1], eye1[0]:eye2[0]]
roi[:] = (0, 0, 0)

cv2.imwrite(output_file_path, img)