What’s Airflow
Airflow is a platform to programmatically author, schedule and monitor workflows.
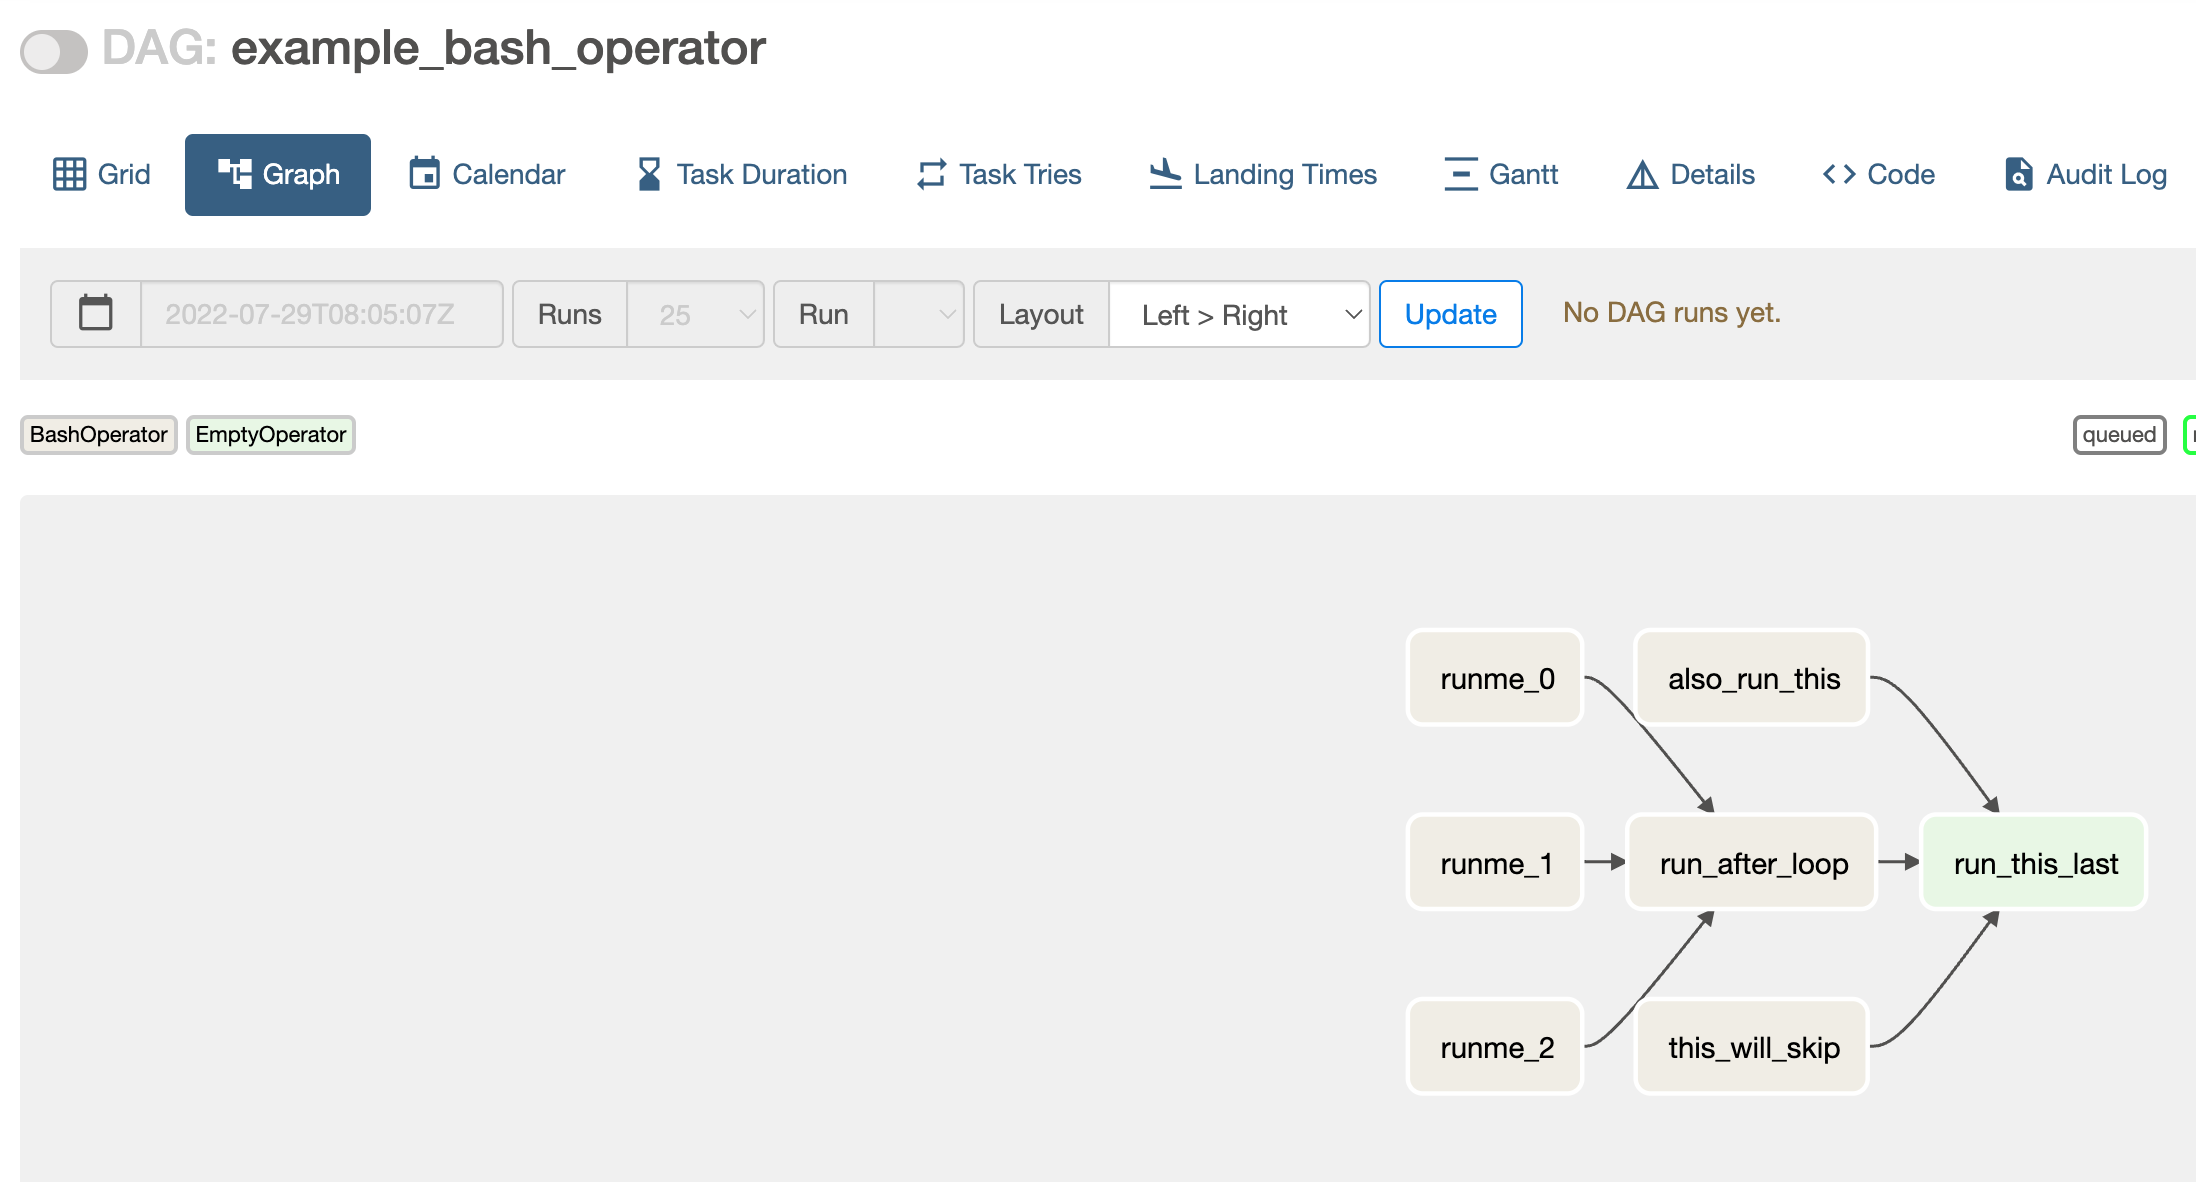
DAGs
Directed Acyclic Graph is a collection of all the tasks you want to run, organized in a way that reflects their relationships and dependencies.
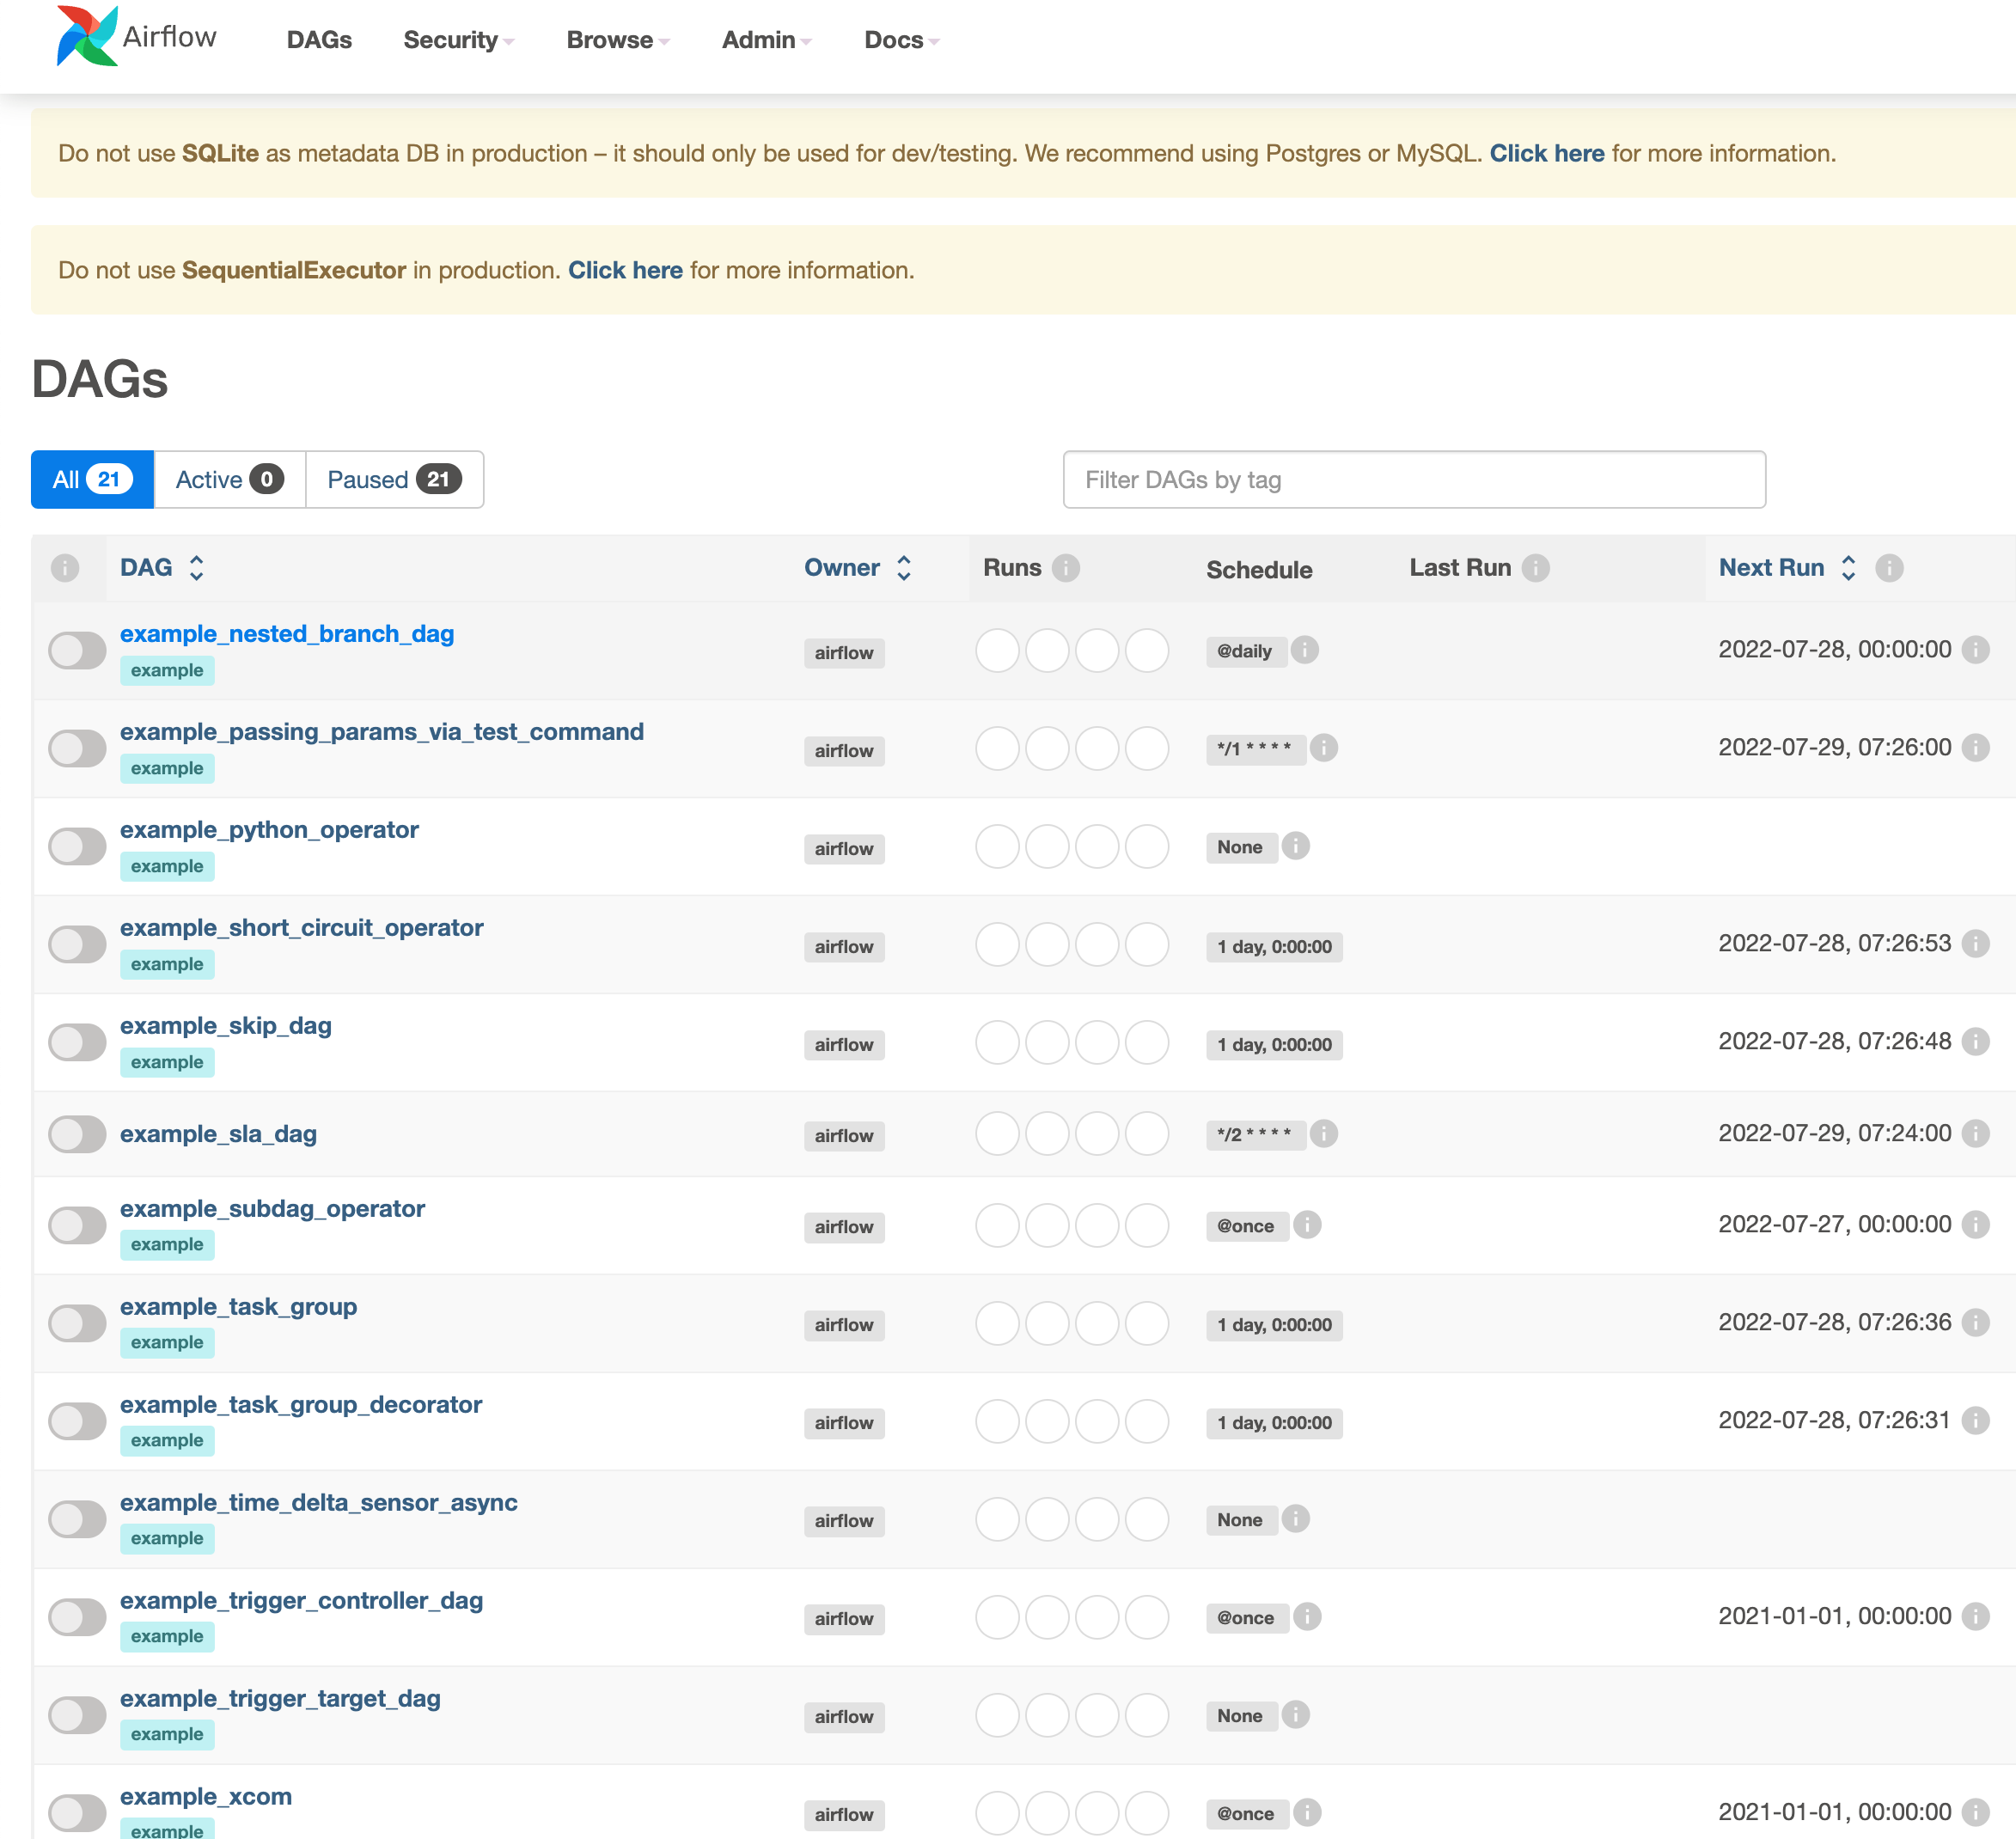
Run a DAG
Source code of example_bash_operator
Click the code tab and you will see the source code.
"""Example DAG demonstrating the usage of the BashOperator."""

import datetime

import pendulum

from airflow import DAG
from airflow.operators.bash import BashOperator
from airflow.operators.empty import EmptyOperator

with DAG(
    dag_id='example_bash_operator',
    schedule_interval='0 0 * * *',
    start_date=pendulum.datetime(2021, 1, 1, tz="UTC"),
    catchup=False,
    dagrun_timeout=datetime.timedelta(minutes=60),
    tags=['example', 'example2'],
    params={"example_key": "example_value"},
) as dag:
    run_this_last = EmptyOperator(
        task_id='run_this_last',
    )

    # [START howto_operator_bash]
    run_this = BashOperator(
        task_id='run_after_loop',
        bash_command='echo 1',
    )
    # [END howto_operator_bash]

    run_this >> run_this_last

    for i in range(3):
        task = BashOperator(
            task_id='runme_' + str(i),
            bash_command='echo "" && sleep 1',
        )
        task >> run_this

    # [START howto_operator_bash_template]
    also_run_this = BashOperator(
        task_id='also_run_this',
        bash_command='echo "run_id= | dag_run="',
    )
    # [END howto_operator_bash_template]
    also_run_this >> run_this_last

# [START howto_operator_bash_skip]
this_will_skip = BashOperator(
    task_id='this_will_skip',
    bash_command='echo "hello world"; exit 99;',
    dag=dag,
)
# [END howto_operator_bash_skip]
this_will_skip >> run_this_last
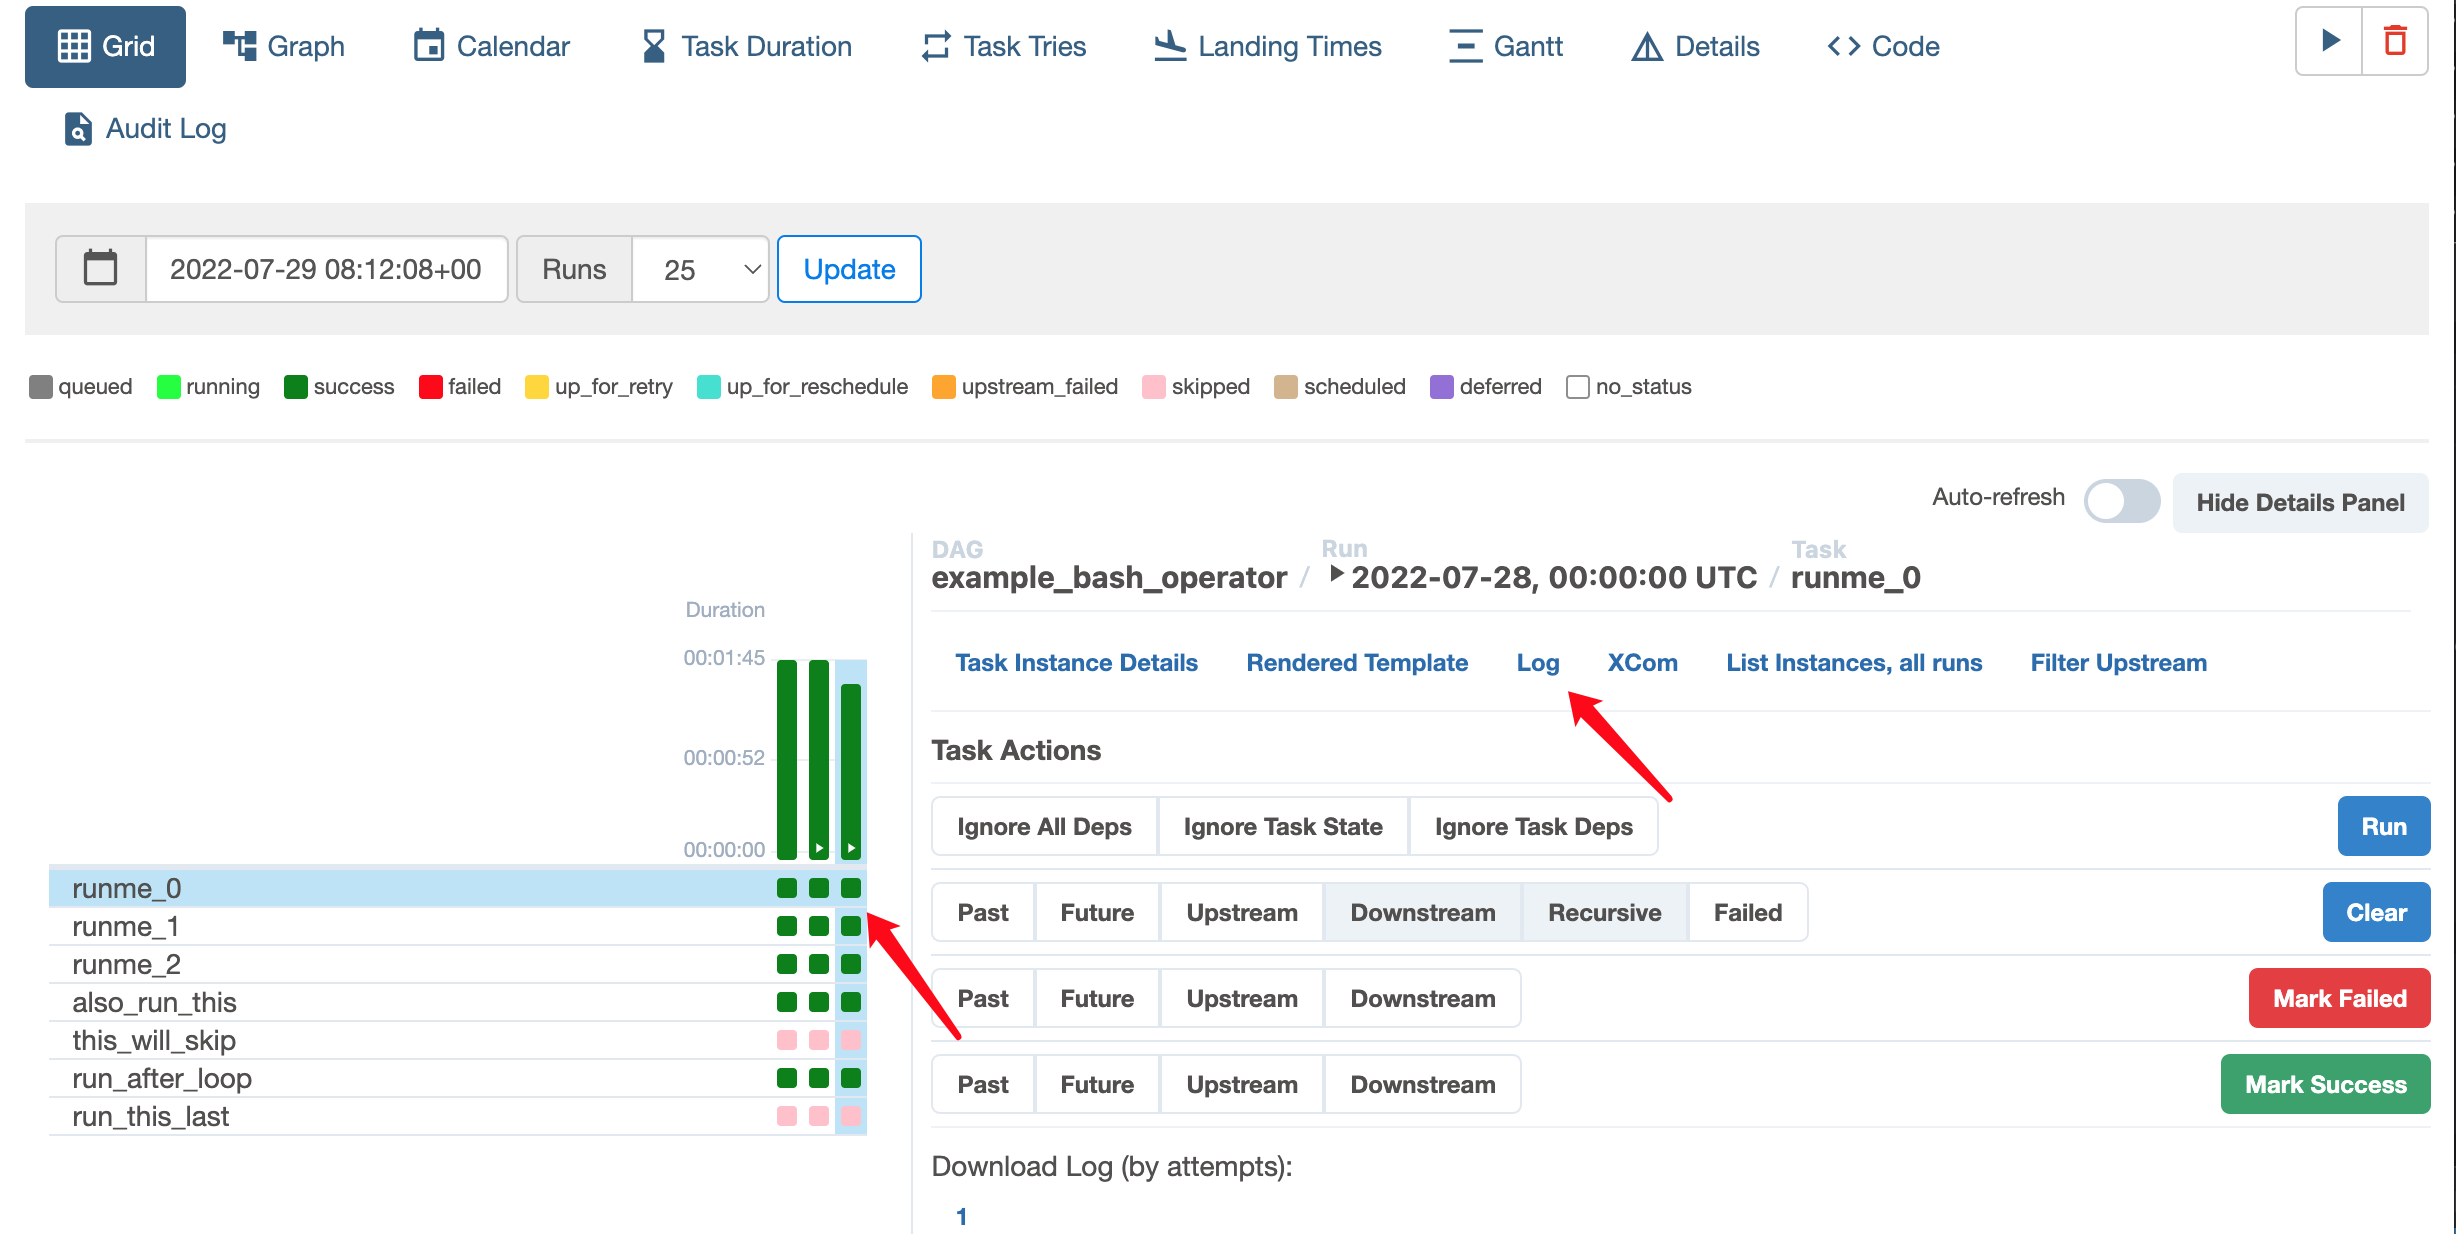
Check the log
Click the Grid and you will see the execution history of your DAGs as well as the tasks there. Click one task and click the log link on the right, you will see the logs.
Install Airflow
export AIRFLOW_HOME=~/airflow

# Install Airflow using the constraints file
AIRFLOW_VERSION=2.3.3
PYTHON_VERSION="$(python --version | cut -d " " -f 2 | cut -d "." -f 1-2)"
# For example: 3.7
CONSTRAINT_URL="https://raw.githubusercontent.com/apache/airflow/constraints-${AIRFLOW_VERSION}/constraints-${PYTHON_VERSION}.txt"
# For example: https://raw.githubusercontent.com/apache/airflow/constraints-2.3.3/constraints-3.7.txt
pip install "apache-airflow==${AIRFLOW_VERSION}" --constraint "${CONSTRAINT_URL}"
Initialize Database
This will create the database with sqlite3 by default. Later we will switch it to Postgresql.
airflow db init
Create admin
airflow users create \
    --username admin \
    --firstname Peter \
    --lastname Parker \
    --role Admin \
    --email spiderman@superhero.org
Startup webserver and scheduler
airflow webserver --port 8080
airflow scheduler
Switch the database to Postgresql
Create the airflow_db database and airflow_user user.
CREATE DATABASE airflow_db;
CREATE USER airflow_user WITH PASSWORD 'airflow_pass';
GRANT ALL PRIVILEGES ON DATABASE airflow_db TO airflow_user;
Update the airflow.cfg file.
sql_alchemy_conn = postgresql+psycopg2://airflow_user:airflow_pass@127.0.0.1/airflow_db
Create the admin again.
```bash
airflow users create \
    --username admin \
    --firstname Peter \
    --lastname Parker \
    --role Admin \
    --email spiderman@superhero.org
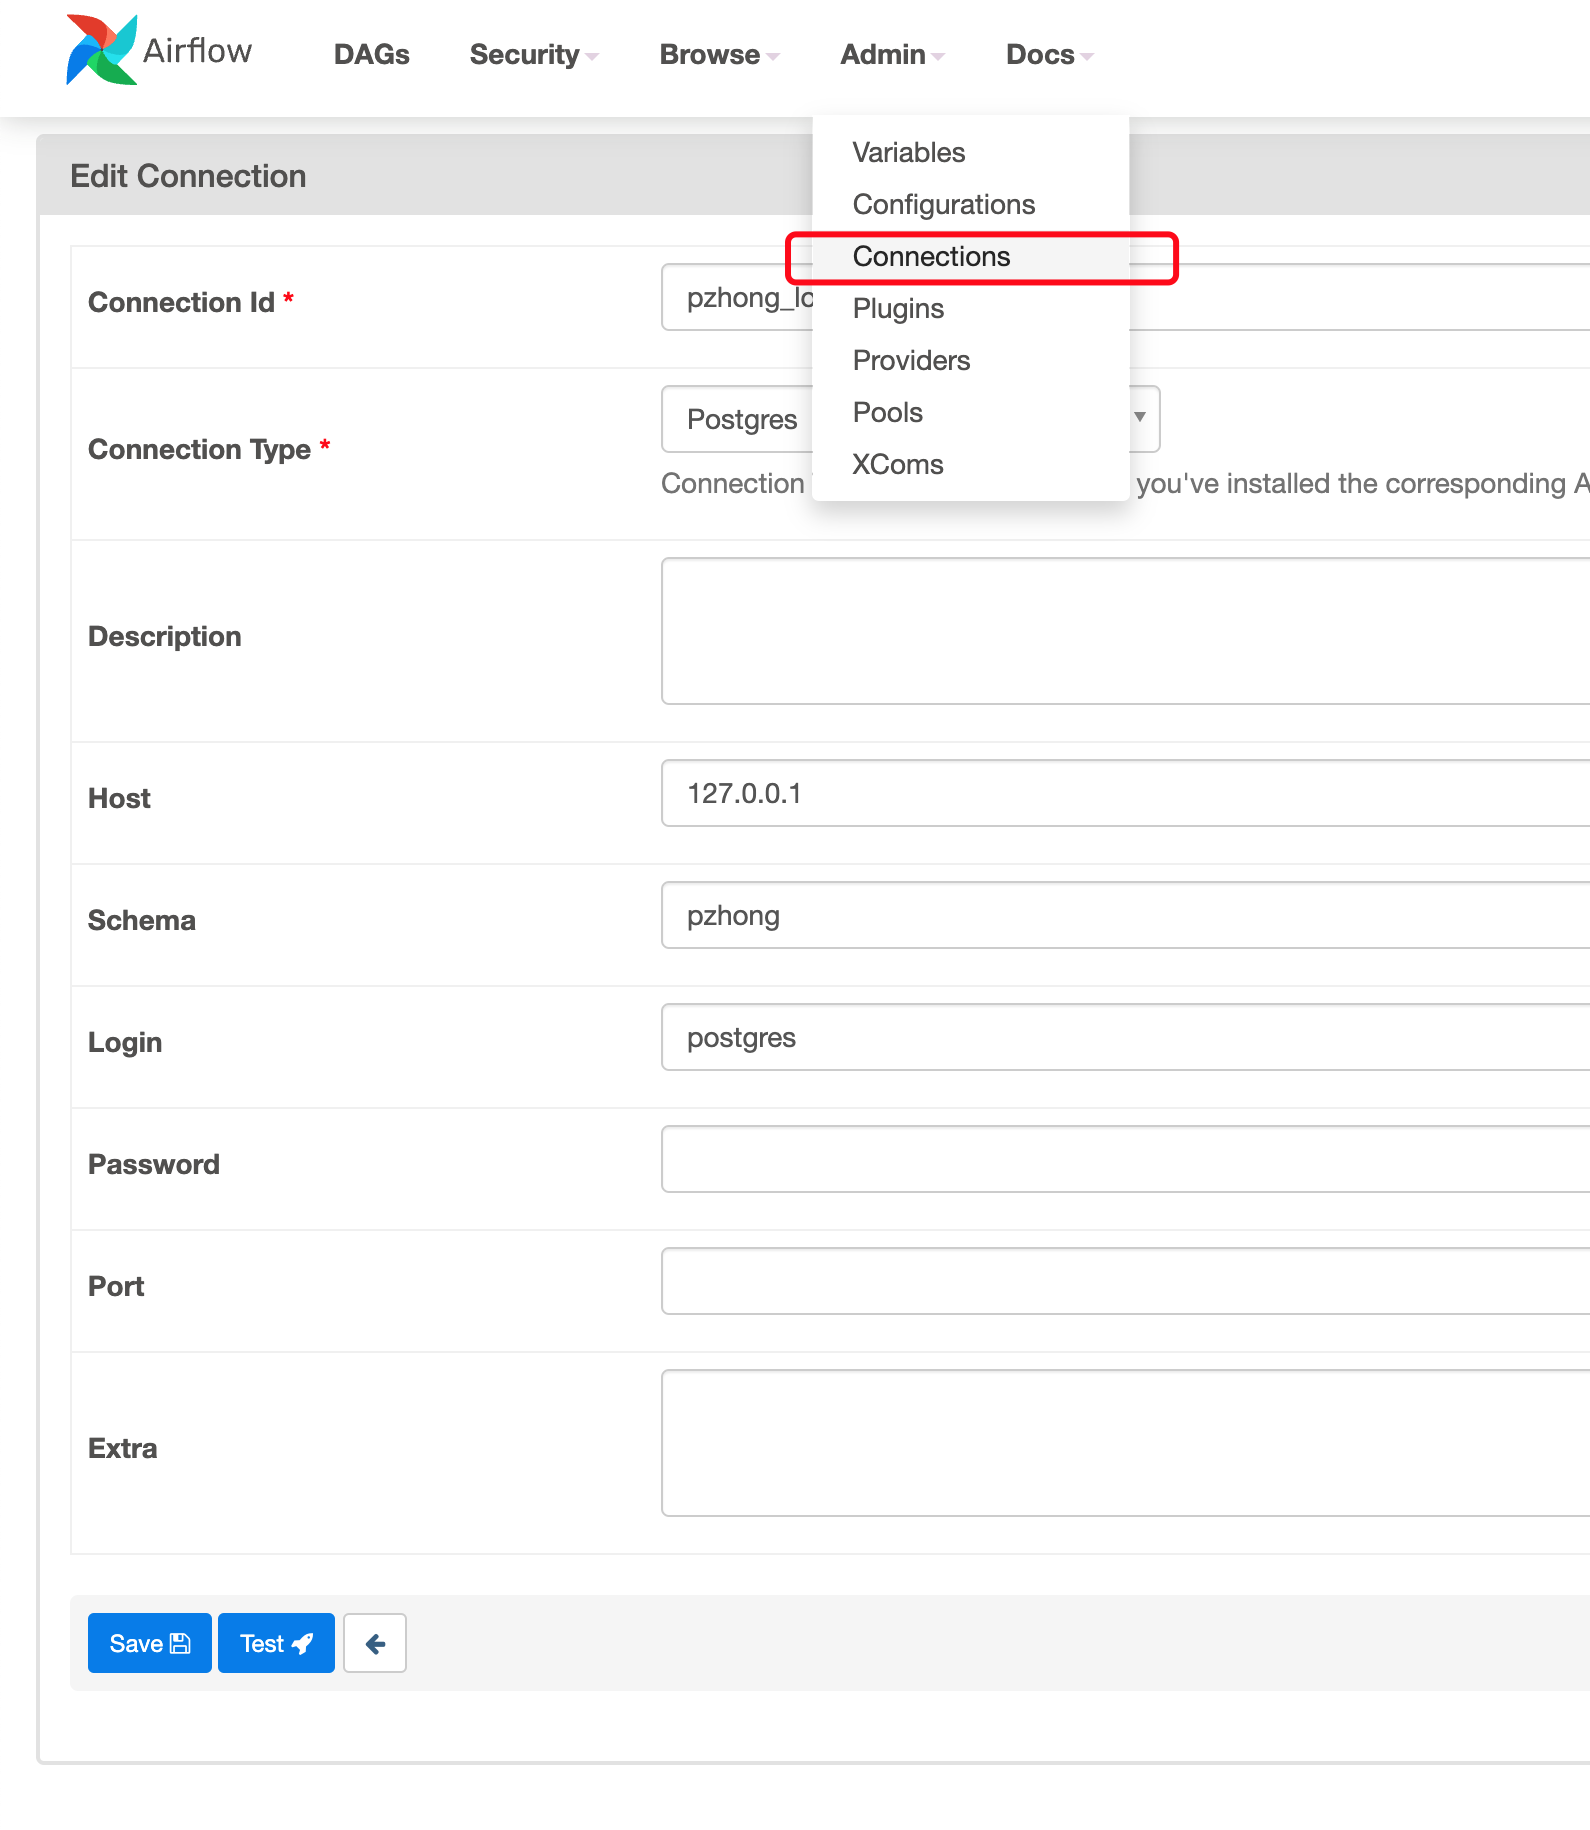
Create a connection
You could create connection in Airflow, then you could use the connection in your Python code.
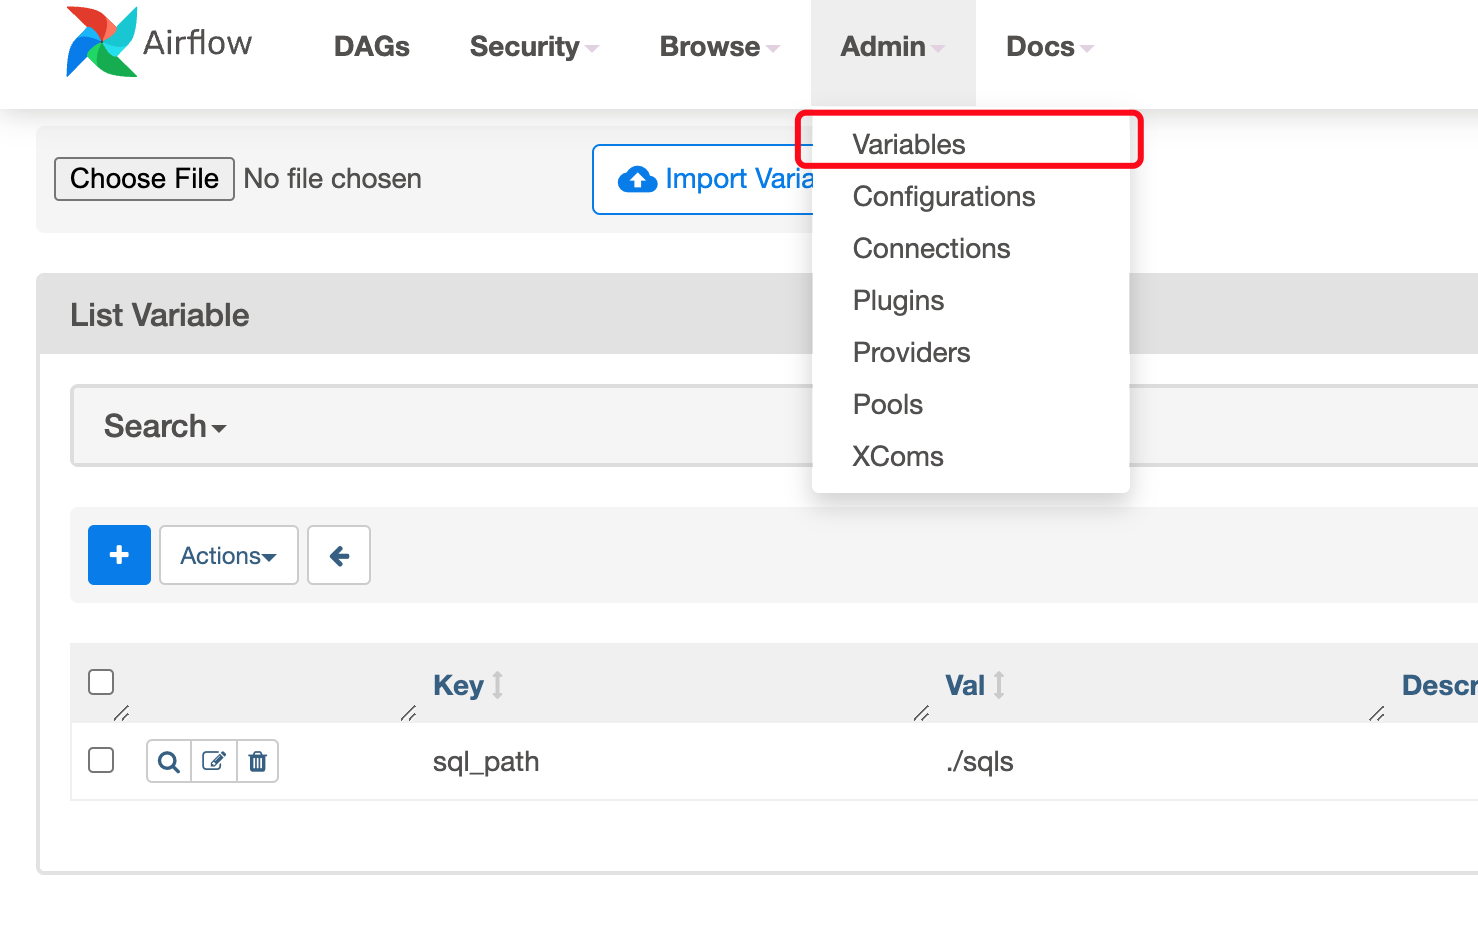
Add a variable
You could also create variables and read it later in you Python code.
Put things together
You could get the variable via tmpl_search_path = Variable.get("sql_path").
You could use the database connection via pg_hook = PostgresHook(postgres_conn_id=conn_id).
Here is the example.
def get_sql_results(sql, conn_id):
    pg_hook = PostgresHook(
      postgres_conn_id=conn_id
    )
    conn = pg_hook.get_conn()
    cursor = conn.cursor()
    cursor.execute(sql)

    desc = cursor.description
    column_names = [col[0] for col in desc]
    results = [dict(zip(column_names, row)) for row in cursor.fetchall()]
    print(results)
    return results


args = {
    'owner': 'airflow',
    'start_date': airflow.utils.dates.days_ago(0),
    'provide_context': True
}

tmpl_search_path = Variable.get("sql_path")

with DAG(
    'etl_demo',
    schedule_interval='*/10 * * * *',
    dagrun_timeout=timedelta(minutes=180),
    template_searchpath=tmpl_search_path,
    default_args=args,
    max_active_runs=1) as dag:

    jobs = get_sql_results('select * from public.airflow_etl_jobs where is_active is TRUE', 'pzhong_local')
    end_task = DummyOperator(task_id="end")

    for job in jobs:
        transfer = PostgresToPostgresOperator(
            sql=job['sql_path'],
            pg_table='.'.join([job['table_schema'], job['table_name']]),
            primary_key=job['primary_key'],
            src_postgres_conn_id=job['src_conn_id'],
            dest_postgres_conn_id=job['dest_conn_id'],
            pg_preoperator=job['preoperator'],
            pg_postoperator=job['postoperator'],
            parameters={ 'proceeded_to': str(job['proceeded_to']) },
            task_id=f"extract_{job['table_name']}",
            dag=dag
        )


        transfer >> end_task
Create the tasks by configuration in database
Create one table as below.
create table airflow_etl_jobs(
	id serial,
	name varchar,
	src_conn_id varchar,
	dest_conn_id varchar,
	table_schema varchar,
	table_name varchar,
	preoperator varchar,
	postoperator varchar,
	sql_path varchar,
	parameters jsonb,
	primary_key varchar,
	cdc_col varchar,
	proceeded_to varchar,
	src_cnt int8,
	dest_cnt int8,
	is_active BOOLEAN
);
and the data will look like this.

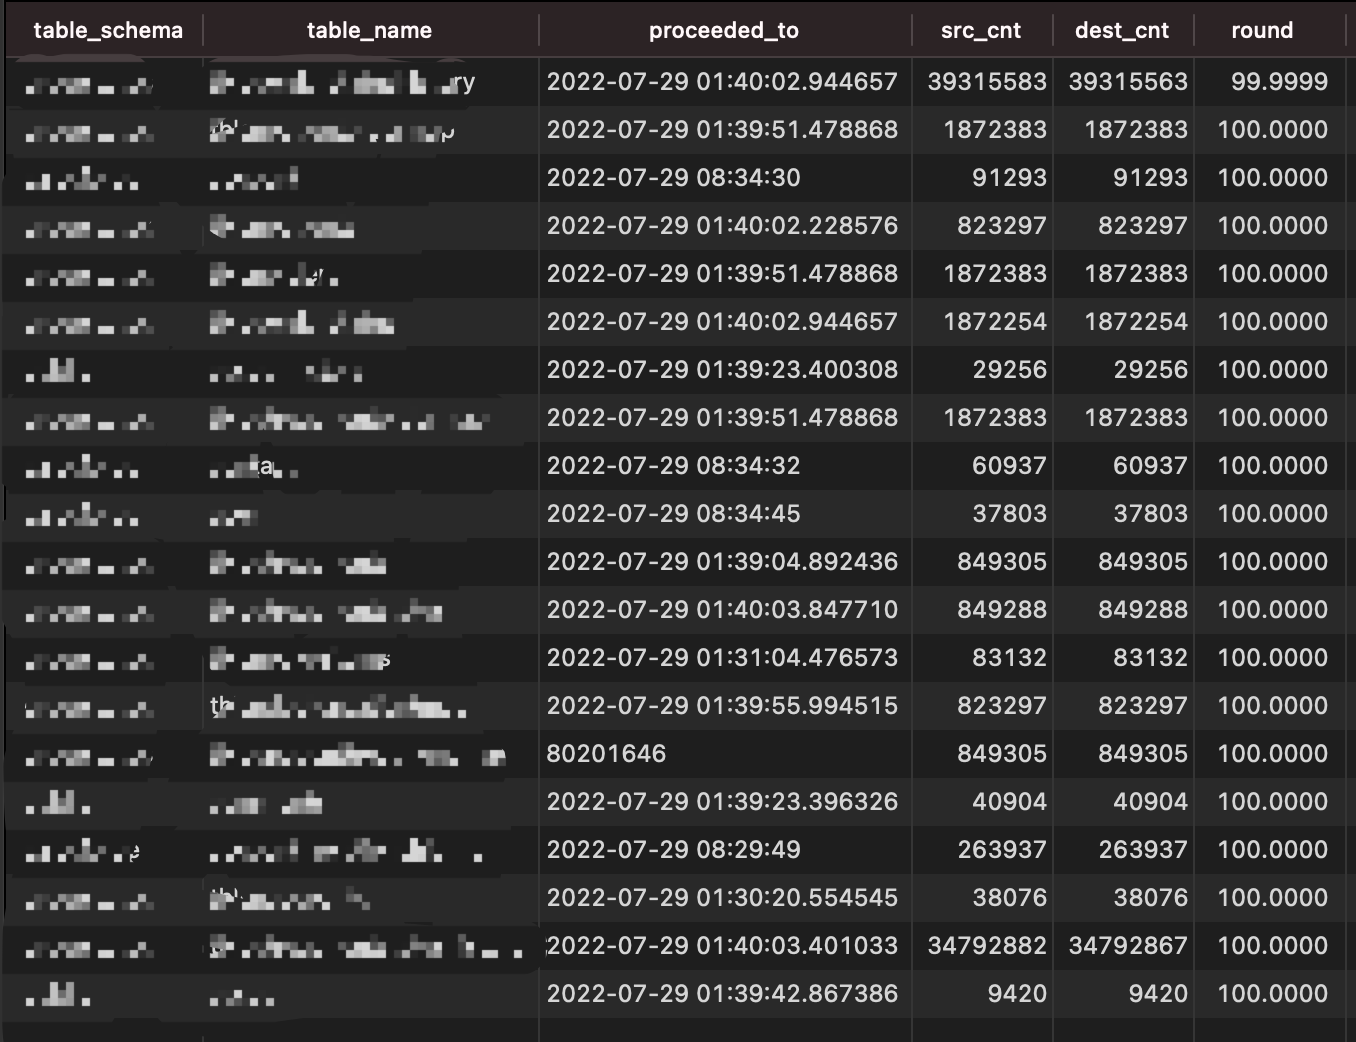
Then you could add job via inserting record in database and monitor the job status by following query.
SELECT
	table_schema,
	table_name,
	proceeded_to,
	src_cnt,
	dest_cnt,
	ROUND(dest_cnt * 100.0 / src_cnt, 4)
FROM
	airflow_etl_jobs
ORDER BY
	ROUND(dest_cnt * 100.0 / src_cnt, 4);
ETL
Initial data load
We need to consider how to implement the initial data load with ETL. You could ask DBA to load the data, it’s suitable for large tables. You could also use ETL tool to migrate the data step by step if you’re ok with the potential slowness.
Delta data
Basically, we used the column modified_at to identify the delta data. It means you need to note down the max modified_at you migrated, and seek for records with lager modified_at to migrate.
Do not do fully load because it’s slow!
Merge operation
If the records are only inserted and never updated, you could ignore this. However, it’s not true in real world. You need to take upsert into consideration. In SQL Server, you could use merge to achieve this, in MySQL and Postgresql, you could use insert into ... on conflict(id) do update ....
Bad data
Sometimes, the modified_at could be null. You may need to manually load them.
Also, it’s possible that many records have the same modified_at, and the record size is larger than the batch size. So you may see your ETL job stuck at processing one day again and again.